Backup files to Amazon S3


After a few years of silence today it came to my mind that I should once again start to write on my blog. During the last 12 odd months I have been involved in developing and revamping several of the websites own by the company I currently work.

In this article I’m going to discuss about the steps I have been using to automate the backing up of the websites that were hosted with Amazon EC2 to Amazon S3 bucket.

The strategy I adapted can be broken down into following 3 steps:

  1. Create a backup copy of each of the database and the website source code (all my websites were developed using PHP) on a daily basis and compress each (database & source code) using tar.gz compression appending the timestamp
  2. Pushing of backup files to Amazon S3 bucket
  3. Set a conjob task to execute to process

Step 1: Create a copy of each of the database and the website source code

To achieve this I created a folder called backups (/home/ubuntu/backups) in the home directory and added the necessary instructions into the shell script as follows.

#!/bin/sh

# (1) set up the required variables
DB_DUMP=<filename>_`date +"_%Y_%m_%d"`.sql
SOURCE_CODE=<filename>_`date +"_%Y_%m_%d"`.tar.gz
DBSERVER=<hostname>
DATABASE=<database name>
USER=<database user>
PASS=<database password>

# (2) use the following command  to create a dump of the database
cd /home/ubuntu/backups/
mysqldump --opt --user=${USER} --password=${PASS} -h ${DBSERVER} ${DATABASE} > ${DB_DUMP}

# (3) compress the mysql database dump using tar.gz compression
tar -zcf ${DB_DUMP}.tar.gz ${DB_DUMP}

# (4) create a copy of the website source, compress it and moved to /home/ubuntu/backups/
cd /var/www/
tar -zcf ${SOURCE_CODE}  <website source code folder>/
mv ${SOURCE_CODE} /home/ubuntu/backups/

# (5) delete the older copies of backups which are more than 3 days old inside /home/ubuntu/backups/
cd /home/ubuntu/backups/
find <filename>_* -mtime +3 -exec rm {} \;

Save the file as backup.sh inside /home/ubuntu/backups

Step 2: Pushing of backup files to Amazon S3 bucket

To achieve this I adapted two approaches and you’ll find that the latter approach is easier. Initially I adapted an approach of using the Amazon AWS’s SDK to move the backup files to Amazon S3 bucket. This approach had an limitation when individual file size (After the initial compression the backup was over 12 GB) exceeded more than 4GB while on a 64 bit architecture Linux box (I used Ubuntu 16.04) since I used PHP. To overcome this I sliced the final output of the compressed file in to multiples of  3.6 GB.

tar czf - / | split -b 3850 MB - ${SOURCE_CODE}.tar.gz.

Approach 1: Using Amazon AWS SDK

Download the appropriate Amazon AWS SDK from here.  In my case I used the PHP SDK using the instructions available here and downloaded the PHP library using the 3rd steps (Installing via Zip file).

<?php
require_once('/home/ubuntu/aws/aws-autoloader.php');
use Aws\S3\S3Client;
use Aws\S3\Exception\S3Exception;

$bucket = '<bucket name>';
$pathToFile = '/home/ubuntu/backups/';
$fileNameSourceCode = ['<filename>_'.date('Y_m_d').'.tar.gz']; // name of the website source code, it should be equal to name of SOURCE_CODE variable found on /home/ubuntu/backups/backup.sh
$fileNameDBDump = '<filename>_'.date('Y_m_d').'.sql.tar.gz';// name of the database dump file, it should be equal to the name of DB_DUMP variable found on /home/ubuntu/backups/backup.sh

$credentials = new Aws\Credentials\Credentials(”, ”);

// Instantiate the client.
$s3 = S3Client::factory([
‘region’ => ‘us-east-1’,  // Since I have create the buckets in US East region (N. Virginia)
‘version’ => ‘2006-03-01’, // Standard version number for the S3 bucket service
‘credentials’ => $credentials
]);

//Pushing the source code file to the Amazon S3 bucket

if(count($fileNameSourceCode) > 0) {
foreach($fileNameSourceCode as $file) {
if(file_exists($pathToFile.$file)) {
try {
// Upload data.
$result = $s3->putObject(array(
‘Bucket’ => $bucket,
‘Key’ => $file,
‘SourceFile’ => $pathToFile.$file,
‘ACL’ => ‘public-read’,
‘Expires’ => gmdate(“D, d M Y H:i:s T”, strtotime(“+15 days”)) //This parameter doesn’t get applied, this we have to set on the bucket from the Amazon S3 account
));

// Print the URL to the object.
echo $result[‘ObjectURL’] . “\n”;
} catch (S3Exception $e) {
echo $e->getMessage() . “\n”;
}
}
}
}

//Pushing the database dump file to the Amazon S3 bucket

if(file_exists($pathToFile.$fileNameDBDump)) {
try {
// Upload data.
$result = $s3->putObject(array(
‘Bucket’ => $bucket,
‘Key’ => $fileNameDBDump,
‘SourceFile’ => $pathToFile.$fileNameDBDump,
‘ACL’ => ‘public-read’,
‘Expires’ => gmdate(“D, d M Y H:i:s T”, strtotime(“+15 days”)) ////This parameter doesn’t get applied, this we have to set on the bucket from the Amazon S3 account
));

// Print the URL to the object.
echo $result[‘ObjectURL’] . “\n”;
} catch (S3Exception $e) {
echo $e->getMessage() . “\n”;
}
}
Save the file as upload_to_s3bucket.php inside /home/ubuntu/backups

Approach 2: Using Amazon S3Tools

The Amazon S3 Tools is a very easy to use command line utility which can be used to push very huge files to Amazon S3 bucket with minimum effort. For Linux & Mac we can use s3cmd while for Windows use S3Express. I found this article on TecAdmin which has comprehensively explained it usage. I followed the following steps to set it up on my server.

  • Setting up of S3tool on the server

Installation

$ sudo apt-get install s3cmd

Configuration

You need to provide the Access Key ID and Secrete Key available with your Amazon AWS account during the configuration by executing the following command. As a best practice it recommends to create an IAM user and provide that creadentials instead of using the root account details.

# s3cmd --configure

  • Setting up the shell script to push the files to S3 Bucket

To achieve this I created a folder called backups (/home/ubuntu/backups) in the home directory and added the necessary instructions into the shell script as follows.


#!/bin/bash

_DB_DUMP=<filename>_`date +"_%Y_%m_%d"`.sql  # name of the website source code, it should be equal to the name of DB_DUMP variable found on /home/ubuntu/backups/backup.sh
_SOURCE_CODE=<filename>_`date +"_%Y_%m_%d"`.tar.gz  # name of the website source code, it should be equal to name of SOURCE_CODE variable found on /home/ubuntu/backups/backup.sh

s3cmd put ${_DB_DUMP} s3://<bucket name>/
s3cmd put ${_SOURCE_CODE} s3://<bucket name>/

Save the file as upload_to_s3bucket.sh inside /home/ubuntu/backups

Step 3: Set a conjob task to execute to process

Now lets set the cronjob task to daily or any required time interval to execute the following two scripts.

Firstly lets make the two shell scripts executable using following command

$ chmod +x /home/ubuntu/backups/backup.sh
$ chmod +x /home/ubuntu/backups/upload_to_s3bucket.sh

Open up the terminal and execute the following command
sudo crontab -e

Enter the following two lines and save.

30 01 * * * /home/ubuntu/backups/backup.sh #set to run the backup 30 minutes passing 1 o'clock in the morning

#use this if used the Amazon AWS SDK approach
00 03 * * * php /home/ubuntu/backups/upload_to_s3bucket.php #set to run the backup daily 3 o'clock in the morning

#use this if used the Amazon S3tools approach

00 03 * * * /home/ubuntu/backups/upload_to_s3bucket.sh #set to run the backup daily 3 o'clock in the morning
Setting up Jenkins Continuous Integration for a PHP project on a Mac Mini Server


With one of my previous post I have run through the steps involve in setting up Jenkins and today I’m going to discuss about the how to get a PHP project integrated with Jenkins on a Mac Mini server(It’s a pain in the ass compared to a Linux box when it comes to setting up Jenkins server).

List of items required

We need to enable and install following modules both on Jenkins as well as on PHP.

  • Jenkins
    • Checkstyle
    • CloverPHP
    • Dry
    • HTML Publisher
    • JDepend
    • Plot
    • PMD
    • Violation
    • xUnit
    • JSHint Report
    • Apache Ant
    • Subversion
    • Jenkins Email Extension
  • PHP modules using the PEAR package
    • phploc
    • pdepend
    • phpmd
    • phpcs
    • phpcpd
    • phpdox
    • phpunit
    • phpcb

Install modules and plugins

Alright, we have list down the items and now lets see how to install each items.

Installation of Jenkins modules

Navigates to Jenkins » Manage Jenkins » Plugin Manager.

Under this section you’ll find four tabs, namely Updates, Available, Installed, Advanced. Select Available tab and tick the above mentioned list of plugins from the list and click on the Install without restart button.

Installation of required PHP modules via PEAR package

Please make sure that you have installed the PHP PEAR package before proceeding with the below steps.

  • phploc – A tool for quickly measuring the size of a PHP project.
    $ sudo pear config-set auto_discover 1
    $ sudo pear install pear.phpunit.de/phploc
  • pdepend – Metrics analysis tool for software developed in PHP.
    $ sudo pear channel-discover pear.pdepend.org
    $ sudo pear install pdepend/PHP_Depend-beta
  • phpmd – It takes a given PHP source code base and look for several potential problems within that source.
    $ sudo pear channel-discover pear.phpmd.org
    $ sudo pear install phpmd/PHP_PMD
  • phpcs – It tokenises PHP, JavaScript and CSS files and detects violations of a defined set of coding standards.
    $ sudo pear install PHP_CodeSniffer
  • phpcpd – It is a Copy/Paste Detector (CPD) for PHP code.
    $ pear install pear.phpunit.de/phpcpd
  • phpdox – It is a documentation generator for generating API documentation in HTML format, for instance, from PHP source code.
    $ sudo pear install -f pear.netpirates.net/phpDox-0.5.0
  • phpunit – It is a documentation generator for generating API documentation in HTML format, for instance, from PHP source code.
    $ sudo pear channel-discover pear.phpunit.de
    $ sudo pear install phpunit/PHPUnit
  • phpcb – It is a documentation generator for generating API documentation in HTML format, for instance, from PHP source code.
    $ sudo pear channel-discover pear.phpqatools.org
    $ sudo pear install --alldeps phpqatools/PHP_CodeBrowser

Fixing the issue:
When you execute Build Now from the project’s menu you’ll notice that following message is displayed under Console Output section.

phpcpd:
     [exec] Warning: require(PHPCPD/Autoload.php): failed to open stream: No such file or directory in /usr/bin/phpcpd on line 49
     [exec] Fatal error: require(): Failed opening required 'PHPCPD/Autoload.php' (include_path='.:') in /usr/bin/phpcpd on line 49

Where ever your encounter a similar error please place the following block of code on the top of the respective script. This required script can be found under /usr/bin. For example with phpcpd place the following block of code.

$path = '/usr/lib/php';
set_include_path(get_include_path() . PATH_SEPARATOR . $path);

Preparation of the build script

I used the Template for Jenkins Jobs for PHP Projects for preparing the build script. The site provides a comprehensive guide to create the build script for Apache Ant.

Elephanti the Revolutionary Lifestyle Media Network


Today social media applications plays an important role in our day-to-day activities as a result of the Web 2.0 revolution that took place in the Internet. It has revolutionized the lifestyle of almost all the individuals and business entities, for the majority of them spending at least few minutes with it has become an integral part of the day. The Elephanti, is a retail media ecosystem that aims to provide a platform for both individuals (Shoppers) and business entities (Merchants) to virtually interact with each other to buy and sells items on the go. It composed of a free Web based application for the Merchants and a free smart phone application (iPhone and Android) for Shoppers.

  • The Merchants can sign up for a free account and be able to create a virtual storefront in few minutes and manage its routine activities via the Web based console to update their profile, add products, post discounts, etc…
  • Those who are signing up as Merchants, initially selects their type of business (Single store, Chain store, Mall, Brand, Department store and Freelancer). Each type of business is modeled with an unique, customized set of features to facilitate its main line of business requirements.
  • For Merchant signing up with Elephanti, the system facilitates the merchant to describe the nature of the business and its specialization areas, such as Fashion retail, Cafes, Dinning venue, Cinema, Book stores, Services, Health and Beauty, Consumer electronic, Grocery stores, Automotive, Hotel, Travel and Tourism, Entertainment venue, etc… Each category further goes into a fine level of detailed specializations.
  • Shoppers only needs to download the app into their mobile phones to follow their favorite merchants, search for interesting place, items, create a shopping list, and many more. Using the app, they will be able to look at stores nearby and see what they have, write a review, add items to their shopping lists.
    • Shoppers will be able to look at places nearby and see what they have by check-in to the place, this provides the shopper and the shop owner a customized set of interactive features.
    • Also the Shoppers can discover Friends on the Elephanti network or sending invitations via other social media networks or via an Email and interact with each other through messaging, sharing activity updates, exchange shopping lists, uploading photo(s) to an album and tag their friends or/and places(Merchants), etc…
    • Shoppers can organize list of items planning buy just by creating a shopping lists and select nearby place(Merchant) they plans to buy it.
    • Rate a place and write a review and/or to comment them.

The main idea of Elephanti is to provide a platform for business owners to create a virtual storefront and invite shoppers to get to know about the items they sell and the discounts they offer, in the meantime the Shoppers are benefited by finding places nearby, items they sell and the discounts they offer and getting touch with their friends, plan their activities and many more.

Change management of database scripts


In this post I’m going to discuss the strategy used by our team to manage the changes taking place in the database. Most of the time we as developers mainly focus on implementing the feature and put less effort on manage the database changes. For instance individual might not straight away see the importance in the first place and also this may not be very important for projects with smaller teams but for projects with a larger scope, involving multiple teams and frequency of changes in the functionality is high then might feel the importance of coming up with a strategy to manage this.

First lets try to identify situations that favours to coming up with a strategy for projects that requires to maintain a RDBMS as the data store.

  • For a project having multiple teams to carrying out the development.
  • For a project with a larger scope, having fortnight or monthly deliverables.
  • For a projects with a longer duration.
  • For projects having teams distributed across different geographic locations.

Above list might not be a complete one, so the reader is always welcome for suggestions. I’ll be taking the above scenarios as the base for the rest of my discussion. The obvious fact is that the change is inevitable. To accommodate this change almost every development team use version controlling to effectively mange the development carry out by each individual in the team. Similarly it’s best to come up with a strategy early in the development life cycle on managing the changes taking place to the database of the application(s). The changes can take place to the database under following categories:

  1. A way to keep track of the new insertions of table(s).
  2. A way to keep track of insertion, updates and deletion of column(s) in a table.
  3. A way to keep track of insertion, updates and deletion of row(s) in a table.
  4. A way to manage application configurations/fixed data mappings.
  5. A way to manage setting up of the database for fresh installation or upgrades.

Step 1

The Step 1 can be handled by maintaining a separate SQL script (lets name it db_tables.sql) to keep track of all the new insertion of table(s) into the application. Most of the situations inserting of new table(s) arises when there is a requirement to implement a new feature. So this would give a clear picture of the database about when and at which point in time each table got introduced and by whom.

Step 2 & 3

The Step 2 & 3 can be handled by maintaining a separate SQL script (lets name it db_tables_tracker.sql).

Step 4

In the Step 4, maintain individual SQL scripts to represent the data mapping of each identified table(lets name them as sys_config.sql, app_modules.sql, etc…), also the changes required by each can be introduced directly in to mapping itself or can be accommodated via db_tables_tracker.sql. For tables having larger number of records as data mapping it would be easier to alter the existing mappings to reflect the new change rather accommodating it via db_tables_tracker.sql. This way it helps an individual to get an idea of the most recent state of the mapping just by looking at the SQL script, this approach fails when the application required to main foreign key constraints among related tables because this approach requires to drop and reintroduce the table every time the update takes place on the table column(s) or to the data.

Step 5

The Step 5 can be elaborated by broken it down in to two.

Fresh installation of the database

To accommodate a fresh installation scenario of the database, all the SQL scripts created in first 4 steps can be combines into one batch by carefully arranging the SQL scripts as follows.

  • SQL script from step 1 – db_tables.sql
  • SQL script from step 2 & 3 – db_tables_tracker.sql
  • SQL scripts from step 4 – sys_config.sql, app_modules.sql, etc…

Note : Above sequence can be automated using a shell script (db_init.sh).

Upgrading of an existing database

For the purpose of preparing the database to accommodate new changes on to the existing table(s) we can maintain a new SQL script called db_upgrade_tracker.sql. This script will only hold the SQL statements required for updating the previous version of the database to the new state, taken from db_tables.sql and db_tables_tracker.sql scripts. Next step is to sequence the flow of the SQL scripts for the database upgrade as follows:

  • db_upgrade_tracker.sql
  • SQL scripts from step 4 – sys_config.sql, app_modules.sql, etc…

Note : Above sequence can be automated using a shell script (db_upgrade.sh).

Setting up osTicket to handle customer inquires


osTicket is a widely used open source ticket management systems that can be easily configured to create tickets to inquires via emails, web interface, etc…

Download

It is always advisable to download the latest stable version of osTicket and move it to preferred location to continue the installation process.

Configuration & Database creation

Move the content inside uploads/ to root of the installation folder.

Navigate to includes/ folder and rename ost-config.sample.php to ost-config.php and grant write permission.

$ cp ost-config.sample.php ost-config.php
$ chmod +w ost-config.php

Connect to MYSQL server and create a new database to hold the tables and the corresponding data of the ticket system.

$ mysql -u<username> -p<password>
mysql> create database <database_name>
mysql> show databases;

Basic Installation: Step 1

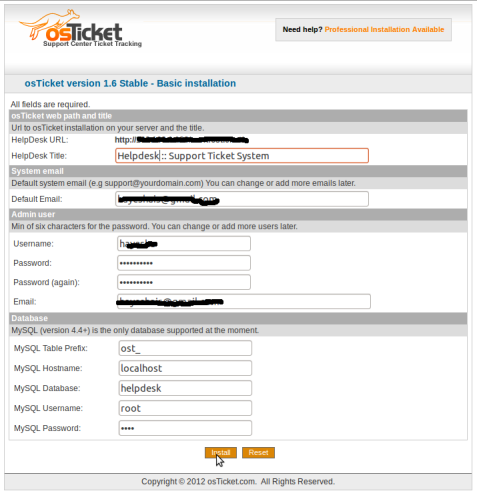
As shown in Figure 1 provide the relevant information to suite your requirement and click Install to proceed to next step. The information it captured is categorised in to following subsections.

  • Web path & title – Installation URL path and the Title(provide a meaningful title to describe your exact purpose) of the osTicket system
  • System email – The email address which acts as the sender for all the outgoing email via the ticket system.
  • Admin user
  • Database

osTicket - Basic Installation

Figure 1: osTicket – Basic Installation

Basic Installation: Step 2

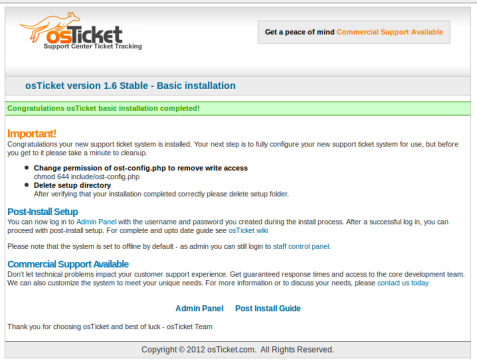
As shown in Figure 2 once the installation is successful carry out the following two tasks.

  • Revoke write permission from ost-config.php using the following command
    • $ chmod 644 include/ost-config.php
  • Delete the setup directory
    • $ rm -fr setup/

Installation success

Figure 2: osTicket – Installation Successful

Reference

Configuration: General Preferences and Settings

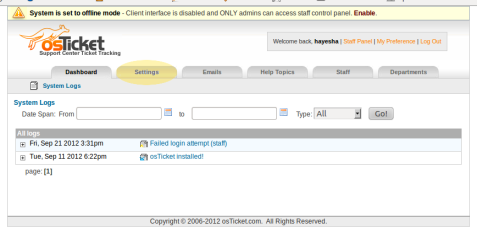
Login to Administration section (http://www.site-url.com/scp/login.php) or click on the Admin Panel link as shown in Figure 2 or invoke Admin Panel (http://www.site-url.com/scp/admin.php) section using the upper navigation bar found on the top right corner. Refer Figure 3.

osTicket - Configuration - Admin Panel

Figure 3: osTicket – Configuration – Admin Panel

Next click on the Settings tab as shown in Figure 3. This section let you manage parameters such as General Settings, Date & Time, Ticket Options & Settings, Email Settings, Autoresponders and Alerts & Notices. I’ll be mainly focusing on parameters found under General Settings and Email Settings.

  • General Settings – Common parameters like Site URL, Title, Site Online/Off-line, Enable Auto Cron, etc…
    • Helpdesk Status – This lets us manage the ticket system go online or off-line.
    • Helpdesk URL – This allows to update the URL fro the ticket system.
    • Default Department – The categorisation which the system used to managed the Staff/Users in the system.
    • Enable Auto Cron – This enables the cronjob tasks scheduled by the system. I’ll be discussing how to configure and set the conjob tasks on the server.
  • Email Settings – Especially important if planning to use the ticket system to fetch email to generate tickets.
    • Incoming Emails – This settings provide the ability to control fetching of emails via POP/IMAP email and email piping.
    • Outgoing Emails – The mail server which outgoing email will be handled.
    • Default System Email – The email address which acts as the sender for all the outgoing email via the ticket system.

Configuration: Admin Panel -> Settings -> API

This section provide the facility to generate the API key used in remote email piping feature. This key needs to be updated in the automail.php or automail.pl files located inside scripts/ folder. Please provide the following two information to generate the API key.

  • Add New IP – Provide the IP address assigned to the server/instance the system is hosted.
  • API Passphrase – This will be used to generated the API key used in email piping feature.

Setting up Email address(es) to automatically fetch to generate tickets.

Lets see how to configure an email account in osTicket to automatically generate a ticket(email ticket) for each email received to the email address. Navigates to Admin Panel -> Email -> Add New Email. Please provide the following information described below.

  • Email Info – Settings are mainly for emailed tickets.
    • Email Address
    • Email Name – The text used as the FROM name of the email.
    • New Ticket Priority – The priority level which the ticket should be assigned.
    • New Ticket Dept – The department which the ticket should get categorised.
    • Login info – Required when IMAP/POP and/or SMTP are enabled
      • Username – The email address or the email ID of the email account.
      • Password – The password of the email account.
  • Mail Account – Setting for fetching incoming emails. Mail fetching must be enabled with autocron active or external cron setup.
    • Status – Enable/Disable email fetch feature
    • Host – Hostname of the POP or IMAP service of the email server
    • Port – The port number which POP or IMAP service available
    • Protocol – IMAP or POP
    • Encryption – Yes or NO
    • Fetch Frequency – The time interval which the ticket system to check for new emails.
    • Maximum Emails Per Fetch
  • SMTP Settings – When enabled the email account will use SMTP server instead of internal PHP mail() function for outgoing emails (optional).
    • Status – Enable/Disable the use of following SMPT details for all out going communication
    • SMTP Host – Hostname of the SMTP service of the email server
    • SMTP Port – The port number which SMTP service available
    • Authentication Required? – Yes or NO

Scheduling the Cron job task

Under General Preferences and Settings we came across a parameter to enables the cronjob tasks scheduled by the system. Open up your favourite editor (preferably vi). and issue following commands.


$ crontab -l //to list already scheduled tasks
$ crontab -e //to scheduled a new task

If this is the first time it will prompt you to select the editor, select one that preferred by you and it will open up the crontab, schedule the task as follows.


# m h dom mon dow command
MAILTO="hayeshais at gmail.com" # this will fire an email upon failure to execute any of the scripts to this email address
*/5 * * * * nobody /usr/bin/php /var/www/api/cron.php
*/5 * * * * nobody wget -q -O /dev/null --user-agent=4816EC4CA293EE2EFCA2C89C88750F4A http://<www.helpdesk.examplesite.com>/api/cron.php
*/5 * * * * nobody /usr/bin/php -q /var/www/api/cron.php

Enjoy.

« Older entries