osTicket is a widely used open source ticket management systems that can be easily configured to create tickets to inquires via emails, web interface, etc…
Download
It is always advisable to download the latest stable version of osTicket and move it to preferred location to continue the installation process.
Configuration & Database creation
Move the content inside uploads/ to root of the installation folder.
Navigate to includes/ folder and rename ost-config.sample.php to ost-config.php and grant write permission.
$ cp ost-config.sample.php ost-config.php

$ chmod +w ost-config.php
Connect to MYSQL server and create a new database to hold the tables and the corresponding data of the ticket system.
$ mysql -u<username> -p<password>

mysql> create database <database_name>

mysql> show databases;
Basic Installation: Step 1
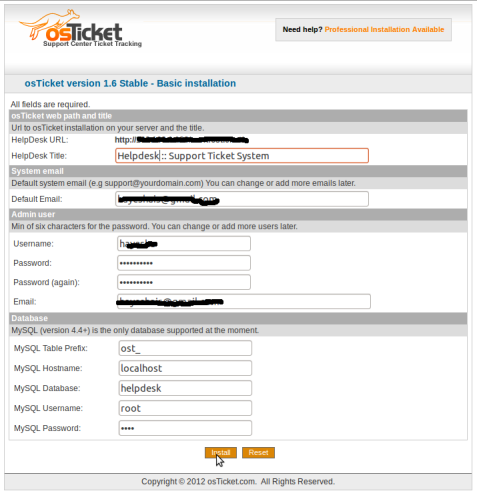
As shown in Figure 1 provide the relevant information to suite your requirement and click Install to proceed to next step. The information it captured is categorised in to following subsections.
- Web path & title – Installation URL path and the Title(provide a meaningful title to describe your exact purpose) of the osTicket system
- System email – The email address which acts as the sender for all the outgoing email via the ticket system.
- Admin user
- Database
Figure 1: osTicket – Basic Installation
Basic Installation: Step 2
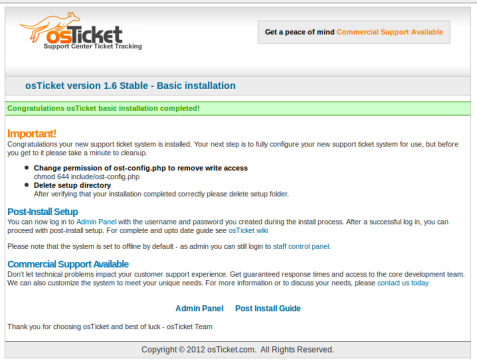
As shown in Figure 2 once the installation is successful carry out the following two tasks.
- Revoke write permission from ost-config.php using the following command
$ chmod 644 include/ost-config.php
- Delete the setup directory
$ rm -fr setup/
Figure 2: osTicket – Installation Successful
Configuration: General Preferences and Settings
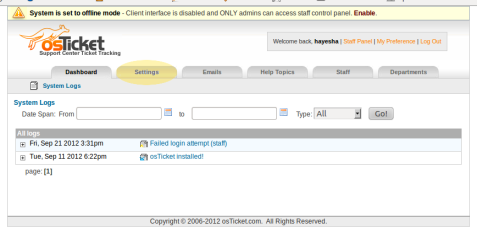
Login to Administration section (http://www.site-url.com/scp/login.php) or click on the Admin Panel link as shown in Figure 2 or invoke Admin Panel (http://www.site-url.com/scp/admin.php) section using the upper navigation bar found on the top right corner. Refer Figure 3.
Figure 3: osTicket – Configuration – Admin Panel
Next click on the Settings tab as shown in Figure 3. This section let you manage parameters such as General Settings, Date & Time, Ticket Options & Settings, Email Settings, Autoresponders and Alerts & Notices. I’ll be mainly focusing on parameters found under General Settings and Email Settings.
- General Settings – Common parameters like Site URL, Title, Site Online/Off-line, Enable Auto Cron, etc…
- Helpdesk Status – This lets us manage the ticket system go online or off-line.
- Helpdesk URL – This allows to update the URL fro the ticket system.
- Default Department – The categorisation which the system used to managed the Staff/Users in the system.
- Enable Auto Cron – This enables the cronjob tasks scheduled by the system. I’ll be discussing how to configure and set the conjob tasks on the server.
- Email Settings – Especially important if planning to use the ticket system to fetch email to generate tickets.
- Incoming Emails – This settings provide the ability to control fetching of emails via POP/IMAP email and email piping.
- Outgoing Emails – The mail server which outgoing email will be handled.
- Default System Email – The email address which acts as the sender for all the outgoing email via the ticket system.
Configuration: Admin Panel -> Settings -> API
This section provide the facility to generate the API key used in remote email piping feature. This key needs to be updated in the automail.php or automail.pl files located inside scripts/ folder. Please provide the following two information to generate the API key.
- Add New IP – Provide the IP address assigned to the server/instance the system is hosted.
- API Passphrase – This will be used to generated the API key used in email piping feature.
Setting up Email address(es) to automatically fetch to generate tickets.
Lets see how to configure an email account in osTicket to automatically generate a ticket(email ticket) for each email received to the email address. Navigates to Admin Panel -> Email -> Add New Email. Please provide the following information described below.
- Email Info – Settings are mainly for emailed tickets.
- Email Address
- Email Name – The text used as the FROM name of the email.
- New Ticket Priority – The priority level which the ticket should be assigned.
- New Ticket Dept – The department which the ticket should get categorised.
- Login info – Required when IMAP/POP and/or SMTP are enabled
- Username – The email address or the email ID of the email account.
- Password – The password of the email account.
- Mail Account – Setting for fetching incoming emails. Mail fetching must be enabled with autocron active or external cron setup.
- Status – Enable/Disable email fetch feature
- Host – Hostname of the POP or IMAP service of the email server
- Port – The port number which POP or IMAP service available
- Protocol – IMAP or POP
- Encryption – Yes or NO
- Fetch Frequency – The time interval which the ticket system to check for new emails.
- Maximum Emails Per Fetch
- SMTP Settings – When enabled the email account will use SMTP server instead of internal PHP mail() function for outgoing emails (optional).
- Status – Enable/Disable the use of following SMPT details for all out going communication
- SMTP Host – Hostname of the SMTP service of the email server
- SMTP Port – The port number which SMTP service available
- Authentication Required? – Yes or NO
Scheduling the Cron job task
Under General Preferences and Settings we came across a parameter to enables the cronjob tasks scheduled by the system. Open up your favourite editor (preferably vi). and issue following commands.
$ crontab -l //to list already scheduled tasks

$ crontab -e //to scheduled a new task
If this is the first time it will prompt you to select the editor, select one that preferred by you and it will open up the crontab, schedule the task as follows.
# m h  dom mon dow   command

MAILTO="hayeshais at gmail.com" # this will fire an email upon failure to execute any of the scripts to this email address

*/5 * * * * nobody /usr/bin/php /var/www/api/cron.php

*/5 * * * * nobody wget -q -O /dev/null --user-agent=4816EC4CA293EE2EFCA2C89C88750F4A http://<www.helpdesk.examplesite.com>/api/cron.php

*/5 * * * * nobody /usr/bin/php -q /var/www/api/cron.php
Enjoy.


SutoCom said,
October 1, 2012 at 1:24 pm
Reblogged this on Sutoprise Avenue, A SutoCom Source.
try what he says said,
July 15, 2013 at 1:20 pm
Amazing things here. I’m very glad to peer your article. Thanks a lot and I am taking a look ahead to contact you. Will you kindly drop me a mail?
Sandra Sousa said,
August 3, 2013 at 12:31 am
Hi!
I really need urgent help, I’m trying to do the account setup email with fetching via IMAP.
I put this problem on the forum off the osTickect but nobody reply, I allready do the changes that you put were but whit no sucess.
Can you please send me a email so I show you my data.
Sandra
Annie said,
November 10, 2013 at 3:15 pm
There is a tutorial at http://www.easycron.com/tutorials/how-to-set-up-cron-job-for-osticket that may help you.
yanni said,
November 29, 2013 at 10:02 am
Thank you for your time spent into writing this How-To.
Your guide helped me a lot. You are a star.
Many thanks
Dustin said,
December 16, 2013 at 5:01 pm
The snow on the screen is annoying and distracting. If I was you I would get rid of it.
thiel said,
April 12, 2016 at 3:10 pm
thanks a lot! perfectly fitted what i was looking for ❤