Elephanti the Revolutionary Lifestyle Media Network


Today social media applications plays an important role in our day-to-day activities as a result of the Web 2.0 revolution that took place in the Internet. It has revolutionized the lifestyle of almost all the individuals and business entities, for the majority of them spending at least few minutes with it has become an integral part of the day. The Elephanti, is a retail media ecosystem that aims to provide a platform for both individuals (Shoppers) and business entities (Merchants) to virtually interact with each other to buy and sells items on the go. It composed of a free Web based application for the Merchants and a free smart phone application (iPhone and Android) for Shoppers.

  • The Merchants can sign up for a free account and be able to create a virtual storefront in few minutes and manage its routine activities via the Web based console to update their profile, add products, post discounts, etc…
  • Those who are signing up as Merchants, initially selects their type of business (Single store, Chain store, Mall, Brand, Department store and Freelancer). Each type of business is modeled with an unique, customized set of features to facilitate its main line of business requirements.
  • For Merchant signing up with Elephanti, the system facilitates the merchant to describe the nature of the business and its specialization areas, such as Fashion retail, Cafes, Dinning venue, Cinema, Book stores, Services, Health and Beauty, Consumer electronic, Grocery stores, Automotive, Hotel, Travel and Tourism, Entertainment venue, etc… Each category further goes into a fine level of detailed specializations.
  • Shoppers only needs to download the app into their mobile phones to follow their favorite merchants, search for interesting place, items, create a shopping list, and many more. Using the app, they will be able to look at stores nearby and see what they have, write a review, add items to their shopping lists.
    • Shoppers will be able to look at places nearby and see what they have by check-in to the place, this provides the shopper and the shop owner a customized set of interactive features.
    • Also the Shoppers can discover Friends on the Elephanti network or sending invitations via other social media networks or via an Email and interact with each other through messaging, sharing activity updates, exchange shopping lists, uploading photo(s) to an album and tag their friends or/and places(Merchants), etc…
    • Shoppers can organize list of items planning buy just by creating a shopping lists and select nearby place(Merchant) they plans to buy it.
    • Rate a place and write a review and/or to comment them.

The main idea of Elephanti is to provide a platform for business owners to create a virtual storefront and invite shoppers to get to know about the items they sell and the discounts they offer, in the meantime the Shoppers are benefited by finding places nearby, items they sell and the discounts they offer and getting touch with their friends, plan their activities and many more.

Revision controlling with Subversion


Subversion also more famouly know as SVN is a version management tool used to manage source code, documents, designs, etc.. in software develpment. SVN is a centralized version control system where the main repository resides in a centralized environment and the parties involved in a project can download a copy of the repository to their local machine to introduce the changes. Once the changes are applied to the files/documents on the local copy, next step is to transfer them to the server. As mentioned SVN is a centralized version control system committing the changes to the server means incrementing the revision of the file/document on the main repository, when the other members of the team updates their local copy of the repository the change also get reflected into their local copy, where as with decentralized version control systems like Git, Mercural, etc.. the users can maintain their own local repository which they can commit the changes without pushing directly to the project in the main repository.

In the following sections I’m going to focus your attention on following aspects of setting up and maintaining a version control system taking SVN as a reference.

  • Setting up a new repository
  • Restoring and Backup a repository
  • Basic commands in SVN

Setting up a new repository

Step 1: Lets start by installing SVN(subversion) and required Apache module (libapache2-svn) into a Linux server/desktop (Debian based distributions but with rest of them are also follows the same). All the commands involve in this process needs to be executed as a super user, so always keep in mind to append sudo to the begining.

$ sudo apt-get install subversion libapache2-svn

Step 2: Creating the target directory for SVN repositories. Please note that name given to the SVN repository will be use as the base URL, which will be used to browse the repository via a web browser. The name can be mapped to any domain name or subdomain name (prefferbly via a virtual host) of your choice for easy access, which I’m not going to explore into it. Execute the following command on the terminal window.

$ sudo mkdir /path/to/svn-repository

Step 3: Introducing a new group to manage the activities of the SVN repositories. Let’s call that group as subversion, execute the following command on the terminal window.

$ sudo addgroup subversion

Step 4: Grant the ownership of the directory create to hold the SVN repositoriesy to the newly created subversion group and the www-data, the group which manages the permissions on resources that is requested via Apache Web server.

$ sudo chown -R www-data:subversion /path/to/svn-repository

Step 5: Now change the mode of the folder created to hold the repository using the following command.

$ sudo chmod -R g+rws /path/to/svn-repository

Step 6: Now we have finished the steps involve in setting up the environment, next let’s look at the steps to create a new project repository called svnproject.

$ sudo svnadmin create /path/to/svn-repository/svnproject

Step 7: Adding user(s) to the newly created subversion group. To introduce a new password file along with a new user, include -c and issue the following command, once hitting enter it prompts for the password and it’s confirmation.

$ sudo htpasswd -c /etc/subversion/passwd Hayesha

To introduce a new user to the existing subversion group to access and carry out activities execute the command as follows

$ sudo htpasswd /etc/subversion/passwd Piushan

Step 8: Grant access to the newly created SVN repository (eg: svnproject) via WebDAV protocol, configure the Apache Web server by adding the following snippet to dav_svn.conf file located under /etc/apache2/mods-available/. Place the following block of code snippt inside dav_svn.conf to reflect the parameters of the newly created SVN repository.

$ sudo cp /etc/apache2/mods-available/dav_svn.conf /etc/apache2/mods-available/dav_svn.conf.bk # Creating a backup of the existing configuration file
$ sudo vim /etc/apache2/mods-available/dav_svn.conf


<Location /svn-repository/svnproject>
    DAV svn
      SVNPath /path/to/svn-repository/svnproject
      AuthType Basic
      AuthName "Svnproject Repository"
      AuthUserFile /etc/subversion/passwd
      Require valid-user
</Location>

Step 9: Grant the ownership of the newly created SVN project to subversion and www-data groups.

$ sudo chown -R www-data:subversion /path/to/svn-repository/svnproject/

Step 10: Now change the mode of newly created SVN project using the following command.

$ chmod -R g+rws /path/to/svn-repository/svnproject/

Step 11: Restart Apache server.

$ sudo /etc/init.d/apache2 restart

Reference: https://help.ubuntu.com/community/Subversion

Restoring and Backup a SVN repository

  • Backup a SVN repository
    • The SVN‘s administrative tool named dump will be used to backup a project inside the SVN repository, this can be achieved using following cmmand.

      $ svnadmin dump /path/to/svn-repository/svnproject > /path/to/backup/svnproject_25_11_2012.dump

  • Restoring SVN project to an existing repository using a SVN backup (dump).
    • Create a new project called recoverproject inside the SVN repository as follows

      $ svnadmin create /path/to/svn-repository/recoverproject

    • Load the SVN dump of the project into new repository location as follows. This may take a while depending on the number of revisions had on the SVN dump used for the restoring.

      $ svnadmin load /path/to/svn-repository/recoverproject < /path/to/svn-project-backup.dump

Reference: https://wiki.archlinux.org/index.php/Subversion_backup_and_restore

Basic commands in SVN

Getting a checkout from a main repository of a SVN project. The syntax is svn checkout <url> or by using svn co <url>, co is the shorten form of checkout.

$ svn checkout http://svn.example.com/svn-repository/svnproject/trunk/xxx

To update the local copy (development version) with the main repository of the SVN project. Navigate to the location of the local copy and execute the following command. svn update or by using svn up (up is the shorten form for update.

$ svn update

In the instances where the local copy (development version) of the code base is out of sync (in a lower revision number(s) compared to main repository of the SVN project’s revision numbers), need to execute the svn cleanup command to sync the local copy to bring it to the server’s current revision in order to avoid conflicts that experience while committing the code.

$ svn cleanup

To transfer the modifications in the local copy of the code base to the main repository of the SVN project need to use the svn commit command. It’s always considered a best parctice to introduce a comment using -m ‘comment’ along with the commit command.

$ svn commit -m "adding the modification done to bla_bla-bla.ext" <filename.ext>

To introduce new file(s) and folder(s) to the SVN project on server use svn add folowed with svn commit commands.

$ svn add <filename.ext> or <folder name>
$ svn commit -m "adding the new file(s) or folder(s) called filename.ext or foldername/" <filename.ext> or <foldername/>

To remove file(s) and folder(s) from the main repository of the SVN project use svn update, svn delete followed by svn commit commands.

$ svn update
$ svn delete <filename.ext> or <folder name>
$ svn commit -m "removing existing file(s) or folder(s) called filename.ext or foldername/" <filename.ext> or <foldername>

References:
    Setting up osTicket to handle customer inquires


    osTicket is a widely used open source ticket management systems that can be easily configured to create tickets to inquires via emails, web interface, etc…

    Download

    It is always advisable to download the latest stable version of osTicket and move it to preferred location to continue the installation process.

    Configuration & Database creation

    Move the content inside uploads/ to root of the installation folder.

    Navigate to includes/ folder and rename ost-config.sample.php to ost-config.php and grant write permission.

    $ cp ost-config.sample.php ost-config.php
    $ chmod +w ost-config.php

    Connect to MYSQL server and create a new database to hold the tables and the corresponding data of the ticket system.

    $ mysql -u<username> -p<password>
    mysql> create database <database_name>
    mysql> show databases;

    Basic Installation: Step 1

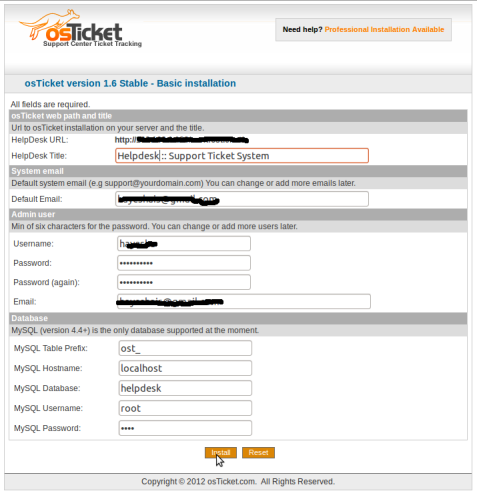
    As shown in Figure 1 provide the relevant information to suite your requirement and click Install to proceed to next step. The information it captured is categorised in to following subsections.

    • Web path & title – Installation URL path and the Title(provide a meaningful title to describe your exact purpose) of the osTicket system
    • System email – The email address which acts as the sender for all the outgoing email via the ticket system.
    • Admin user
    • Database

    osTicket - Basic Installation

    Figure 1: osTicket – Basic Installation

    Basic Installation: Step 2

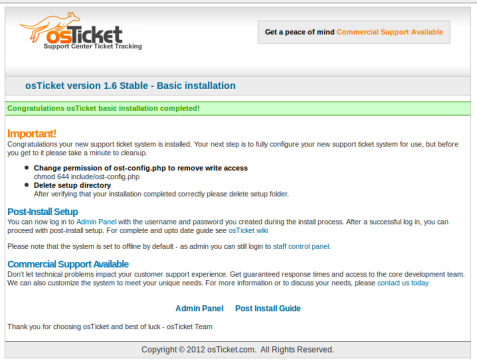
    As shown in Figure 2 once the installation is successful carry out the following two tasks.

    • Revoke write permission from ost-config.php using the following command
      • $ chmod 644 include/ost-config.php
    • Delete the setup directory
      • $ rm -fr setup/

    Installation success

    Figure 2: osTicket – Installation Successful

    Reference

    Configuration: General Preferences and Settings

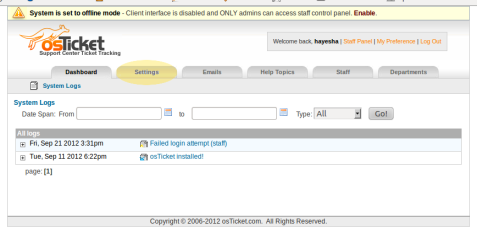
    Login to Administration section (http://www.site-url.com/scp/login.php) or click on the Admin Panel link as shown in Figure 2 or invoke Admin Panel (http://www.site-url.com/scp/admin.php) section using the upper navigation bar found on the top right corner. Refer Figure 3.

    osTicket - Configuration - Admin Panel

    Figure 3: osTicket – Configuration – Admin Panel

    Next click on the Settings tab as shown in Figure 3. This section let you manage parameters such as General Settings, Date & Time, Ticket Options & Settings, Email Settings, Autoresponders and Alerts & Notices. I’ll be mainly focusing on parameters found under General Settings and Email Settings.

    • General Settings – Common parameters like Site URL, Title, Site Online/Off-line, Enable Auto Cron, etc…
      • Helpdesk Status – This lets us manage the ticket system go online or off-line.
      • Helpdesk URL – This allows to update the URL fro the ticket system.
      • Default Department – The categorisation which the system used to managed the Staff/Users in the system.
      • Enable Auto Cron – This enables the cronjob tasks scheduled by the system. I’ll be discussing how to configure and set the conjob tasks on the server.
    • Email Settings – Especially important if planning to use the ticket system to fetch email to generate tickets.
      • Incoming Emails – This settings provide the ability to control fetching of emails via POP/IMAP email and email piping.
      • Outgoing Emails – The mail server which outgoing email will be handled.
      • Default System Email – The email address which acts as the sender for all the outgoing email via the ticket system.

    Configuration: Admin Panel -> Settings -> API

    This section provide the facility to generate the API key used in remote email piping feature. This key needs to be updated in the automail.php or automail.pl files located inside scripts/ folder. Please provide the following two information to generate the API key.

    • Add New IP – Provide the IP address assigned to the server/instance the system is hosted.
    • API Passphrase – This will be used to generated the API key used in email piping feature.

    Setting up Email address(es) to automatically fetch to generate tickets.

    Lets see how to configure an email account in osTicket to automatically generate a ticket(email ticket) for each email received to the email address. Navigates to Admin Panel -> Email -> Add New Email. Please provide the following information described below.

    • Email Info – Settings are mainly for emailed tickets.
      • Email Address
      • Email Name – The text used as the FROM name of the email.
      • New Ticket Priority – The priority level which the ticket should be assigned.
      • New Ticket Dept – The department which the ticket should get categorised.
      • Login info – Required when IMAP/POP and/or SMTP are enabled
        • Username – The email address or the email ID of the email account.
        • Password – The password of the email account.
    • Mail Account – Setting for fetching incoming emails. Mail fetching must be enabled with autocron active or external cron setup.
      • Status – Enable/Disable email fetch feature
      • Host – Hostname of the POP or IMAP service of the email server
      • Port – The port number which POP or IMAP service available
      • Protocol – IMAP or POP
      • Encryption – Yes or NO
      • Fetch Frequency – The time interval which the ticket system to check for new emails.
      • Maximum Emails Per Fetch
    • SMTP Settings – When enabled the email account will use SMTP server instead of internal PHP mail() function for outgoing emails (optional).
      • Status – Enable/Disable the use of following SMPT details for all out going communication
      • SMTP Host – Hostname of the SMTP service of the email server
      • SMTP Port – The port number which SMTP service available
      • Authentication Required? – Yes or NO

    Scheduling the Cron job task

    Under General Preferences and Settings we came across a parameter to enables the cronjob tasks scheduled by the system. Open up your favourite editor (preferably vi). and issue following commands.


    $ crontab -l //to list already scheduled tasks
    $ crontab -e //to scheduled a new task

    If this is the first time it will prompt you to select the editor, select one that preferred by you and it will open up the crontab, schedule the task as follows.


    # m h dom mon dow command
    MAILTO="hayeshais at gmail.com" # this will fire an email upon failure to execute any of the scripts to this email address
    */5 * * * * nobody /usr/bin/php /var/www/api/cron.php
    */5 * * * * nobody wget -q -O /dev/null --user-agent=4816EC4CA293EE2EFCA2C89C88750F4A http://<www.helpdesk.examplesite.com>/api/cron.php
    */5 * * * * nobody /usr/bin/php -q /var/www/api/cron.php

    Enjoy.

    Run nodejs server continuously using forever


    By last Friday morning the open bugs count raised above 150 mark and we managed to take it down to under 25 by the end of the day, thanks to the dedicated effort by the team. Among them, one was to make the Nodejs server run continuously. In our application we are using the Nodejs to implement a near-realtime notification module, which involved pushing notifications and updates to the Web application as well to the Mobile application. Faye module was used to implement the identified channel patterns required to identify different user types and their respective activities each user type executes.

    Nodejs is a powerful, Event-driven, I/O based or JavaScript based server that can be used to develop interactive applications. It was developed on top of the V8 JavaScript engine.

    Installing Nodejs on Ubuntu

    I came across an easier approach to install Nodejs via the Ubuntu Package Manager.

    $ sudo apt-get install python-software-properties
    $ sudo add-apt-repository ppa:chris-lea/node.js
    $ sudo apt-get update
    $ sudo apt-get install nodejs npm

    Install Forever

    In the last command it installed the Node Package Manager(npm). The npm provides the facility to install any module to Nodejs in a manner similar to installing application on Ubuntu via apt-get.

    $ sudo npm install forever --global

    Setting the –global parameter makes the module accessible globally

    Updating Nodejs & the modules to latest stable release

    Nodejs comes with a module called n aka node version manager provides the facility to update the module to its latest or stable release.

    Install n

    $ sudo npm install --global n

    Updating Nodejs using n

    $ sudo n --global latest/stable
        or
    $ sudo n --global custom v0.x.x

    Updating Nodejs modules using n

    $ sudo n --global npm
        or
    $ sudo n --global forever

    Div based Fixed or Fluid CSS/HTML layout Template


    About two year back I worte an article introducing a simple HTML structure to organize the content on the web page as shown below.

    Layout structure

    header
    sidebar left
    content
    sidebar right
    footer

    The above illustration just a simple introduction to how the template looks like. This HTML/CSS layout structure consists of examples illustrating the usage of Fixed and Fluid layouts covering following aspects

    • Without any Sidebars
    • With one Sidebar on Left
    • With one Sidebar on Right
    • With two Sidebars on either sides (Left and Right)

    Folder sturcture

    • css – consists of all the CSS files
    • js – consists of all the JavaScript files
    • images – consists of all the image files
    • plugins – consists of all the third party components
    • template – consists of examples
    • readme.txt – simple introduction
    • lgpl.txt – lgpl license file

    CSS

    Inside the css folder you’ll find several files as illustated below, I adapted this structure after studing the Drupal Zen theme. Currely the theme is not Sass aware.

    • Core
      • html-elements.css – style rules to neutralize browser defaults and define baseline formatting to HTML elements
      • form-elements.css – style rules to format form blocks
      • layout.css – style rules to control the overall layout of the template (fixed or fluid)
      • sidebar.css – style rules to ncontrol the formating of sidebar(s)
      • print.css – style rules to format the web page when printing to a paper or PDF/Postscript.
      • website.css – style rules that requires to meets the look and feel of the custome design (main CSS file)
    • Optional
      • website-popup.css – style rules used for popul dialogs
      • handheld.css – style rules required to override website.css to make the site mobile friendly
      • ie_8.css – to keep IE 8 specific style rules
      • ie_7.css – to keep IE 7 specific style rules
      • ie_6.css – to keep IE 6 specific style rules

    The above CSS files linked to the HTML markup was done within HTML head element as illustrated in Figure 1. CSS files with IE version specifc style rules were loaded inside a conditional comment block.

    Figure 1: Linking of CSS files

    JavaScript (breed of ECMAScript)

    Inside the js folder you’ll find the javascript files used by the theme. I have used jQuery library as the base for all the client-side scripting requirements.

    • actions.js – to handle client side logic
    • window.orientation.js – to control the orientation of the page when viewing from a handheld device.

    The above JavaScript files and the ones mentioned under plugins section was linked to the HTML markup was done just before the HTML closing body element as illustrated in Figure 2. This method was adapted to minimized the loading delay introduce by JavaScript files to the clent browser.

    Figure 2: Linking of JavaScript files

    Images

    Inside the images folder you’ll find all the images used in the theme. Inside this you’ll find a folder called icons, which holds third party icons find from the Web (unfortunately I’m unable to locate the repository, my apologies to the creator/owner of the icon.)

    Plugins

    Inside the plugin folder you’ll find all the third pary libraries used in the theme.

    Templates

    Inside the template folder you’ll find examples illustrating following layouts

    • Fixed layout
      • no-sidebars-tableless-fixed
      • sidebar-left-tableless-fixed
      • sidebar-right-tableless-fixed
      • two-sidebars-tableless-fixed
    • Fluid layout
      • no-sidebars-tableless-fluid
      • sidebar-left-tableless-fluid
      • sidebar-right-tableless-fluid
      • two-sidebars-tableless-fluid

    Fixed/Fluid switching

    The switching between the Fixed and Fluid layout structures and be very easily achieved by toggleing the class attribute found on the HTML body element as follows:

    • Fixed – fixed-layout
    • Fluid – fluid-layout

    <body class="fixed-layout">
                or
    <body class="fluid-layout">

    With and without Side-bars switching

    The switching between the With and without Side-bars layout structures and be very easily achieved by toggleing the class attribute found on the first HTML div element next to body element as follows:

    <body class="fixed-layout">
    <div id="wrapper" class="no-sidebars">
                or
    <body class="fixed-layout">
    <div id="wrapper" class="sidebar-left">
                or
    <body class="fixed-layout">
    <div id="wrapper" class="sidebar-right">
                or
    <body class="fixed-layout">
    <div id="wrapper" class="two-sidebars">

    To create an easily customizable div based HTML/CSS template by myself was their in my mind for sometimes and I’ll be sharing it for the benefit of others. The template can be download form Github repository.

    « Older entries